- Proxmox Backup Deduplication

If you use the Proxmox Backup Server to perform updates of Proxmox and the virtualizations running there, setup is quite simple. Unlike other backups, such as borg backup, the Proxmox Backup Server does not perform deduplication during the backup itself.
After setting up the backup, everything worked fine for quite some time. But then one day I received error messages saying that there was no more space available on the backup server. I was surprised, because I knew that the Proxmox backup server also deduplicates data. So it shouldn’t have used up much space, and above all, it shouldn’t have been constantly filling up.
So I searched for a while and then found out that you have to configure deduplication and retention policy on the backup server. To do this, you have to create a “Prun & GC Job.” To do this, open the backup server GUI via the URL and go to Datatastore/. In my case, this is Backup.

There, under Garbage Collection Job, you need to set when this should run. You should also create a “Prune Job” by clicking on “And.” It should look something like this:

After that, you should no longer have any space problems. If you want, you can also receive an email report about the cleanup.
- Custome Style in WordPress with Eventprime
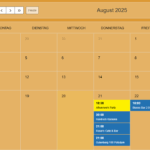
On this webpage, I am using Eventprime to display events in a calendar view. By default, the calendar entries use a very small font size.
Increasing the font size took me a while. There is no clear description on the EventPrime page, and I could not find any helpful information in any forum.
I therefore had to debug the page to identify the correct elements to modify. Here is the custom CSS that you need to add to your webpage:
/* EventPrime Kalenderansicht - Monats/Wochen/Tag Ansicht */

/* Event-Zeit im Kalender */
.fc-event-time {
    font-size: 14px !important;
    font-weight: 500;
}

/* Event-Titel im Kalender */
.fc-event-title {
    font-size: 12px !important;
    font-weight: 600;
    line-height: 1.4em;
}

/* Popup Event-Titel */
.ep_event_popup_title {
    font-size: 18px !important;
    font-weight: 600;
}

/* Popup Zeit und Datum */
.ep_event_popup_date_time_wrap,
.ep_event_popup_time,
.ep_event_popup_address,
.ep_event_popup_date {
    font-size: 14px !important;
}
This increases the font size for each calendar entry, as well as for the pop-up that appears when you hover over an entry. I found this setting made the text much more readable. You can adjust the font size to your liking.
There are two ways to inject CSS: Either use the EventPrime settings custom CSS tab. Or you can use the custom CSS option in your theme customiser. I prefer the first option since this will not get lost when you change the theme, unlike the second option.
- SSH Keys in Bitwarden
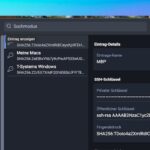
Bitwarden recently introduced a special SSH Key item type, which allows you to securely generate, store, and manage SSH key pairs inside your vault.
By default, Bitwarden can generate new SSH keys for you. This is the recommended option if you are setting up new infrastructure or accounts, since you can create and manage keys directly inside Bitwarden.
However, if you already have existing SSH keys, you might want to import them into Bitwarden instead of generating new ones.
This is possible, but there is a catch: many existing keys are still in the older PEM format, starting with:
-----BEGIN RSA PRIVATE KEY-----
If you try to import such a key into Bitwarden via “SSH Key → Import from clipboard”, you’ll get the error:
Format not supported
Solution
Bitwarden only accepts SSH keys in the new OpenSSH format, which looks like this:
-----BEGIN OPENSSH PRIVATE KEY-----
.
.
.
-----END OPENSSH PRIVATE KEY-----
To convert an existing RSA key into the required format, simply run:
ssh-keygen -p -N "" -f ~/.ssh/id_rsaDescription:
-p→ rewrite the key (“change passphrase” mode)-N ""→ keep an empty passphrase-f→ specify the key file
After this, your private key will be in the correct OpenSSH format and can be imported into Bitwarden without issues.
Bitwarden will automatically generate the Public Key and the Fingerprint during import.Summary
- Option 1: Let Bitwarden generate new SSH keys (recommended for new setups)
- Option 2: Import your existing SSH keys – just convert them to the OpenSSH format first with
ssh-keygen -p -N "" -f ~/.ssh/id_rsa.
This way, you can securely store both new and old SSH keys in Bitwarden.
- Install GO on Windows in the user space

I had the problem that I had to work with Windows, where I don’t have admin rights and therefore couldn’t install anything without admin rights. However, when you download the Windows .msi file from GO, you need it for the installation. So you have to do this with the ZIP file and install GO in the user home directory.
You can download the ZIP file here. Then unzip it in Windows. You need to find a path in your home directory where you want to install it. I found it best to do this where other software is already installed in the home directory. This is: C:\Users\\AppData\Local\Programs
Copy the go folder from the archive to this location so that you then have C:\Users\\AppData\Local\Programs\go. It is important to copy the entire folder. Now you need to set the path. However, this does not work via the GUI without admin rights, but it does work with Powershell, though. Open Powershell and execute the following commands:$userpath = [System.Environment]::GetEnvironmentVariable("PATH","USER") $userpath = $userpath + ";$env:USERPROFILE\AppData\Local\Programs\go\bin" [System.Environment]::SetEnvironmentVariable("PATH",$userpath,"USER")First, save the existing user path in the variable of the same name. Then add the path to GO at the end. It is important to set the path to the bin folder. The last command then sets the user path in the USER PATH variable.
You can check this with after starting a new powershell session:
echo $env:pathThe path should now be visible at the end of the path displayed. For this to work in Powershell, you need to open a new Powershell session. Then you can use
go versionto see if everything is working.
Now you can also use GO in Visual Code, for example. Just install the GO extension and it will work without any errors. - Connecting Ulysses to WordPress

I have now started writing my texts and blogs with Ulysses. To publish the texts on the blog, you have to connect to the WordPress blog. My WordPress is hosted on a Strato server with Plesk. Authorizing WordPress is not that easy.
Whenever I tried to connect to WordPress, I got an error message. First, I tried to connect via the website. I entered the general URL of the blog in the URL field: https://blog.domain.xxx. I was redirected to the website, entered the name for the application password, and when I returned to Ulysses, the following message appeared: „Cannot access blog. Please verify the WordPress account in your browser.“ After searching around a bit, I decided to try using xmlrpc.php. So I entered the URL https://blog.domain.xxx/xmlrpc.php. When I did that in the Ulysses URL field, the window changed and I was asked to enter my username and password.
In this case, you have to create the APP password yourself. To do this, log in to WordPress. Then click on your account and then on Edit Account. Scroll down to the bottom of the page. Under Application Passwords, enter a name for the password and then click Add Application Password. A new password will be generated, which you must then copy here. It cannot be displayed again later, so you must save it or enter it directly in the Ulysses authentication.
Unfortunately, this did not lead to the desired result. In fact, the blog website was no longer accessible. I was also unable to access the Plesk website. It seemed likely that my IP had been blocked by Fail2Ban.
So I had to connect to the server via ssh. A search with
fail2ban-client banned
then showed that the IP had been blocked by the plesk-modsecurity jail. This recognizes access to xmlrpc.php as potentially problematic. So you should take a look at the log of the web application firewall in Plesk. Log in to Plesk after unblocking your IP
fail2ban-client unbanand click on Tools & Settings / Web Application Firewall. Click on ModSecurity Logfile and you will see this in a new window. Search for the IP or xmlrpc.php. Once you have found the entries, search for the ID of the security rule. It looks something like this:
[id "210492"]Then enter this ID in the „Security Rule IDs“ field. Then click Apply and OK. Now you can log in.
Lesedauer < 1 Minute